logo
Install Learn Run a node Wallets Earn Develop Smart Contracts Use ID
  • Discourse
  • Installation

    • Downloads - Mainnet
    • Downloads - Testnet
    • Verification instructions
  • Learn

    • Learn about Concordium
      • Identities
        • Company identity creation
      • Accounts
      • Glossary of Concordium Terms
  • Concordium Wallets

    • Deciding between the wallets
      • Transactions overview
    • Wallet FAQs
      • Concordium Wallet for Mobile FAQ
      • Concordium Wallet for Web FAQ
    • Set up the Concordium Wallet for Web
    • Set up the Concordium Wallet for Mobile
    • Set up the Concordium Legacy Wallet
    • Create an identity
      • Change identity name
    • Create an account
      • Change account name
    • Send CCD
    • Connect dApps to wallets
      • Proofs and revealing information
    • Tokens in the wallet
    • Shield and unshield CCD on an account
      • Make a shielded transfer on an account
    • Make a backup of identities, accounts, and addresses
    • Export a private key
    • Recover your Wallet
    • Find and share your account address
    • Update your passcode and biometric settings
    • Inspect a release schedule
    • Manage address book
    • Desktop Wallet
      • Set up the Desktop Wallet
        • Set up the LEDGER device and install the Concordium LEDGER App
      • Use the Desktop Wallet
      • Transfer CCD with a schedule in Desktop Wallet
      • Apply a transaction log filter in the Desktop Wallet
      • Update the Desktop Wallet
      • Reset desktop wallet data
      • Shared accounts with multiple credentials in Desktop Wallet
        • Create a credentials file
        • Add credentials to an account
        • Create a multi-signature CCD transfer in the Desktop Wallet
        • Create a scheduled transfer in the Desktop Wallet
        • Sign a transaction proposal
        • View transaction proposals
  • Earn with Concordium

    • How to earn with Concordium
      • Bakers
        • Baker management
        • Add baker
        • Change baker options
        • Run a baker node on Windows
        • Run a baker node on macOS
        • Run a baker node on Ubuntu
        • Run a baker node on Docker
        • Become a baker using the Concordium Client
      • Delegation
        • Delegate to a baker pool or passive delegation
        • Update delegation to a baker pool or passive delegation
        • Remove delegation to a baker pool or passive delegation
      • Delegation and baking FAQ
  • Develop on Concordium

    • Developer resources
      • SDKs and APIs
      • dApp examples
      • Dashboards and Status Pages
      • Auxiliary Tools
      • gRPC V2 documentation
      • gRPC documentation
    • Run a node on Concordium
      • Ubuntu nodes
        • Run a node on a server with Ubuntu on Mainnet
        • Run a node on a server with Ubuntu on Testnet
        • Troubleshoot a node on a server with Ubuntu
      • MacOS nodes
        • Run and manage a node on macOS
        • Troubleshoot a node on MacOS
      • Windows nodes
        • Run and manage a node on Windows
        • Concordium Windows node runner service configuration
        • Troubleshoot a node running on Windows
      • Docker nodes
        • Run a node with Docker
        • Troubleshoot a node on a server with Docker
    • Concordium Client
      • Concordium Client transactions
      • Querying a node
    • Run a local chain
  • Use Concordium's ID Layer

    • Use ID: Create proofs
    • The gallery with ID authentication
      • Writing the verifying backend
      • Interacting with a wallet
      • Setting up the front end
  • Smart Contracts v1

    • Introduction
      • Smart contract modules
      • Smart contract instances
      • Smart contract schemas
      • Developing smart contracts in Rust
    • Quick start guide
    • Best practices
      • Development best practices
    • Tutorials
      • Setup the development environment
      • Counter
      • PiggyBank
        • Writing the piggy bank smart contract
        • Testing the piggy bank smart contract
        • Deploying the piggy bank smart contract
        • Setting up a front end
      • wCCD
        • Understanding the wCCD token protocol
        • Interacting with the wCCD token protocol
        • Setting up the front end
        • Running your first full dApp
      • The Voting dApp
        • Writing a voting smart contract
        • Setting up the front-end
      • Mint an NFT
        • Upload the NFT
        • Intialize, build, and deploy the smart contract
        • Mint and transfer the NFT
      • Mint a semi-fungible token
        • Setup the development environment
        • Smart contract modifications
        • Mint and transfer semi-fungible token
      • Mint fungible tokens
        • Smart contract implementation for fungible tokens
        • Mint, transfer, and burn fungible tokens
      • NFT marketplace smart contract tutorial
        • Build and deploy the smart contract
      • eSealing
        • Exploring the eSealing dapp
      • Sponsored Transactions
        • Exploring the sponsored Transactions Smart Contract
        • Exploring the sponsored Transactions dApp
        • Wallet Connect
      • Smart Contract Upgrade
        • Native upgradability
    • Contract development guides
      • Install tools for development
      • Setting up a smart contract project
      • Compile a Rust smart contract module
      • Return custom errors
      • Locally simulate contract functions
      • Build a contract schema
      • Build using no_std
      • Fallback entrypoints
      • Make a contract upgradeable
      • Work with the JSON parameters
    • Contract testing guides
      • Unit test a contract in Rust
      • Integration test a contract in Rust
    • On-chain guides
      • Deploy a smart contract module
      • Initialize a smart contract instance
      • Interact with a smart contract instance
      • Inspect a smart contract instance
      • Invoke a smart contract instance
    • References
      • Cryptographic primitives
      • Contract host functions
      • Local settings
      • References on-chain
      • Schema JSON representation
      • Simulation contexts
      • Rust contract examples (repo)
      • concordium-std
    • Ethereum developer onboarding
      • FAQs
    • Solana developer onboarding
      • Overview
      • FAQs
  • Smart Contracts v0

    • Introduction
      • Smart contract modules
      • Smart contract instances
      • Smart contract schemas
      • Developing smart contracts in Rust
    • Tutorials
      • Writing the piggy bank smart contract
      • Testing the piggy bank smart contract
    • Contract development guides
      • Install tools for development
      • Setting up a smart contract project
      • Compile a Rust smart contract module
      • Unit test a contract in Rust
      • Return custom errors
      • Locally simulate contract functions
      • Build a contract schema
      • Build using no_std
    • On-chain guides
      • Deploy a smart contract module
      • Initialize a smart contract instance
      • Interact with a smart contract instance
      • Inspect a smart contract instance
    • References
      • Schema JSON representation
      • Simulation contexts
      • Contract host functions
      • References on-chain
      • Local settings
      • Rust contract examples (repo)
      • concordium-std
  • Low-code NFT marketplace

    • Concordium low-code NFT framework
    • Low code NFT marketplace
    • Low-code NFT minting tool
  • Resources

    • CCDScan
      • CCDScan Blocks overview
      • CCDScan Transactions overview
      • CCDScan Accounts overview
      • CCDScan Staking overview
      • CCDScan Nodes overview
    • Release notes - Mainnet
    • Release Notes - Testnet
    • Legal
      • Terms and conditions
      • Terms and Conditions for Concordium Desktop Wallet
      • Terms and Conditions for Concordium Legacy Wallet (previously Concordium Mobile Wallet)
      • Third Party Licenses
      • Third-party Software and Hardware Notices
      • Concordium Wallet for Web Third Party Licenses
      • Concordium Desktop Wallet Third Party Licenses
    • Contact Anonymity Revokers and Identity Providers
On this page
  • Schemas
  • Register your public key
  • Submit a sponsored updateOperator transaction
  • Submit a sponsored transfer transaction

Sponsored Transactions Frontend and Backend#

The goal of this part of the tutorial is to set up the frontend and the backend locally and to understand the three flows that the dApp provides.

You can explore the hosted sponsored transaction service. The sponsored transaction service consists of a frontend and a backend. You can start your own service by following the instructions in the frontend README.md file and then the instructions in the backend README.md file. Alternatively, follow the steps in the README.md file to deploy the docker container. The docker container will set up the frontend as well as the backend.

Note

Comprehensive instructions on how to set up the Concordium Wallet for Web, create an account in the Concordium Wallet for Web, get some testnet CCD and run a local frontend can be found in wCCD frontend-set-up section.

The frontend supports the following three flows with the Concordium Wallet for Web (or Concordium Wallet for Mobile that uses WalletConnect):

  • Register a public key (associated with the account from your wallet) in the smart contract. This action is paid by the user.

  • Create the message of a sponsored updateOperator transaction => Sign it with the wallet => Submit the signature to the /submitUpdateOperator backend endpoint.

  • Mint an NFT to your wallet account => Create the message of a sponsored transfer transaction => Sign it with the wallet => Submit the signature to the /submitTransfer backend endpoint.

The backend is a server that exposes two endpoints:

  • POST /submitUpdateOperator

  • POST /submitTransfer

After submitting the signature to the /submitUpdateOperator or the /submitTransfer endpoint, the backend creates a sponsored transaction and submits it on-chain to the permit function in the smart contract {index: SPONSORED_TX_CONTRACT_INDEX, subindex: 0}. The deployed smart contract code can be found here. After the transaction is sent to the blockchain node, the backend returns the transaction hash to the frontend.

The backend server has to have access to a blockchain node and an account (with its associated private key) that is funded with some CCD to submit the sponsored transaction to the chain. The backend wallet will pay for the transaction fees on behalf of the user.

Schemas#

The frontend uses several json schemas in the ./frontend/src/constants.ts file such as:

export const SERIALIZATION_HELPER_SCHEMA = 'FAAFAAAAEAAAAGNvbnRyYWN0X2FkZHJlc3MMCwAAAGVudHJ5X3BvaW50FgEFAAAAbm9uY2UFCQAAAHRpbWVzdGFtcA0HAAAAcGF5bG9hZBACAg';

export const PUBLIC_KEY_OF_PARAMETER_SCHEMA = 'FAABAAAABwAAAHF1ZXJpZXMQARQAAQAAAAcAAABhY2NvdW50Cw';

export const PUBLIC_KEY_OF_RETURN_VALUE_SCHEMA = 'FAEBAAAAEAEVAgAAAAQAAABOb25lAgQAAABTb21lAQEAAAAPHiAAAAAF';

These schemas can be generated in the smart contract folder with the command below.

cargo concordium build --schema-json-out ./

This command creates a file with the json schema of your smart contract in your current directory.
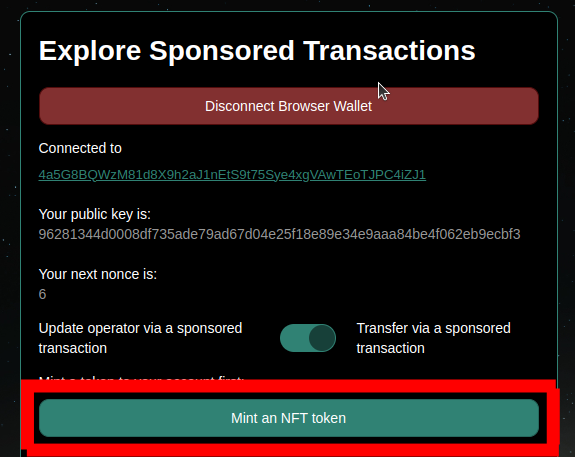
Register your public key#

Ensure that you are connected with the correct account to the frontend. Select the Registration Public Key tab to register your public key in the smart contract as shown below:

Register public key gif

If the registration was successful, your current public key and your next nonce are displayed.

You can export your keys file from the Concordium Wallet for Web as follows:

../../../_images/pic1.png ../../../_images/pic2.png ../../../_images/pic3.png

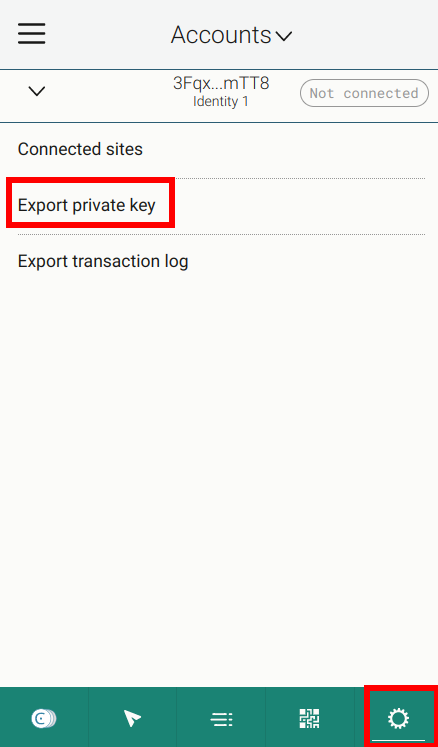
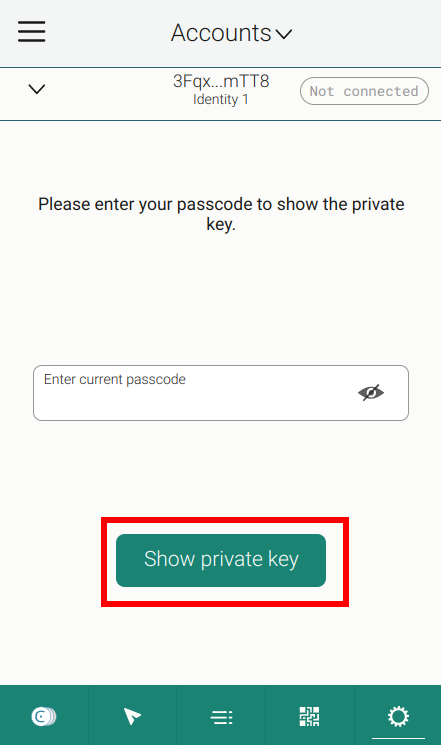
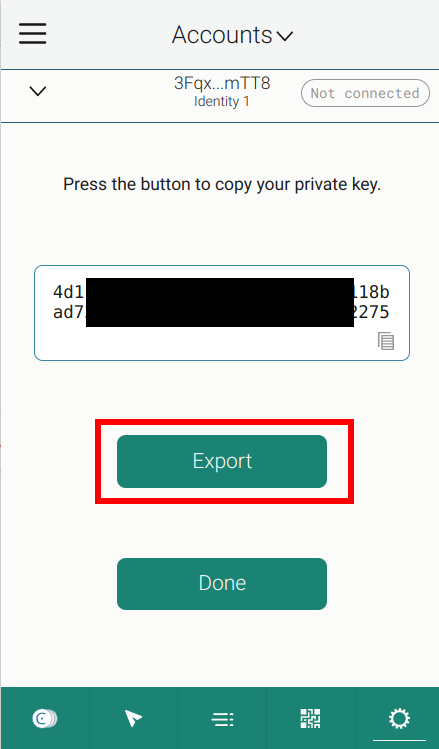
In this exported file, you will find a verifyKey (your public key), which should be identical to the displayed public key at the frontend. The frontend also displays your next nonce associated with your account. This nonce is initially 0 and increases every time a successful sponsored transaction is recorded in the smart contract that was signed by your account.

Note

The nonce is used as a method of preventing replay attacks by ensuring that a signed message by your account can not be reused a second time.

Submit a sponsored updateOperator transaction#

Update operator gif

The GIF shows an example of input parameters that can be used to successfully execute a sponsored updateOperator transaction. The transaction should be successfully submitted by the backend to the blockchain which can be checked on the blockchain explorer by clicking the transaction hash displayed at the frontend.

When exploring the code, you will realize that the input parameter to the permit function and the message that is signed in the wallet are rather complex. For example, the message for the sponsored updateOperator transaction is as follows:

const operatorAction = addOperator
   ? {
      Add: [],
   }
   : {
      Remove: [],
   };

const updateOperator =
   [
      {
         operator: {
            Account: [operator],
         },
         update: operatorAction,
      }
   ]

const payload = serializeTypeValue(
   updateOperator,
   toBuffer(UPDATE_OPERATOR_SCHEMA, 'base64')
);

const message = {
   contract_address: {
      index: Number(SPONSORED_TX_CONTRACT_INDEX),
      subindex: 0,
   },
   nonce: Number(nonce),
   timestamp: EXPIRY_TIME_SIGNATURE,
   entry_point: 'updateOperator',
   payload: Array.from(payload),
};

Because the schema is included in the smart contract, you can use the format returned by the below command to have a guideline on how to create the message and input parameters for the functions in the smart contract:

$concordium-client contract show 4376 --grpc-port 10000 --grpc-ip node.testnet.concordium.com

Submit a sponsored transfer transaction#

Transfer gif

The GIF shows an example of input parameters that can be used to successfully execute a sponsored transfer transaction. The transaction should be successfully submitted by the backend to the blockchain which can be checked on the blockchain explorer by clicking the transaction hash displayed at the frontend. You can also check that your to account is now the owner of the token_id.

When exploring the code, you will realize that the input parameter to the permit function and the message that is signed in the wallet are rather complex. For example, the message for the sponsored transfer transaction is as follows:

const transfer =
   [
      {
         amount: '1',
         data: '',
         from: {
            Account: [from],
         },
         to: {
            Account: [to],
         },
         token_id: tokenID,
      },
   ]

const payload = serializeTypeValue(
     transfer,
     toBuffer(TRANSFER_SCHEMA, 'base64')
);

const message = {
   contract_address: {
      index: Number(SPONSORED_TX_CONTRACT_INDEX),
      subindex: 0,
   },
   nonce: Number(nonce),
   timestamp: EXPIRY_TIME_SIGNATURE,
   entry_point: 'transfer',
   payload: Array.from(payload),
};

Because the schema is included in the smart contract, you can use the format returned by the below command to have a guideline on how to create the message and input parameters for the functions in the smart contract:

$concordium-client contract show 4376 --grpc-port 10000 --grpc-ip node.testnet.concordium.com

Note

The NFT smart contract used in the hosted demo app is meant for exploring sponsored transactions. To ease this process, the mint function can be called by any account to mint a token. 
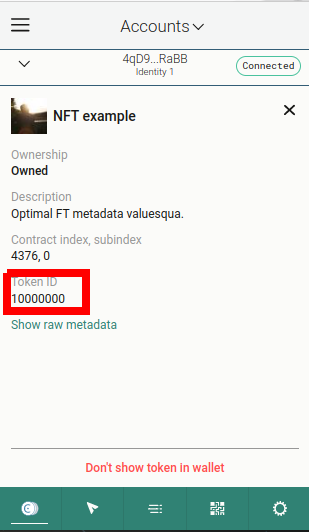
Token_ids are stored in the smart contract in little-endian order and a counter is used to increase the token_id by 1 every time the mint function is invoked. The wallet displays the token_id bytes in a hex string. In other words, the first token minted will have the token_id=01000000, the second token minted will have 02000000, …, 0f000000, 10000000, …, ff000000, 00010000, … . 
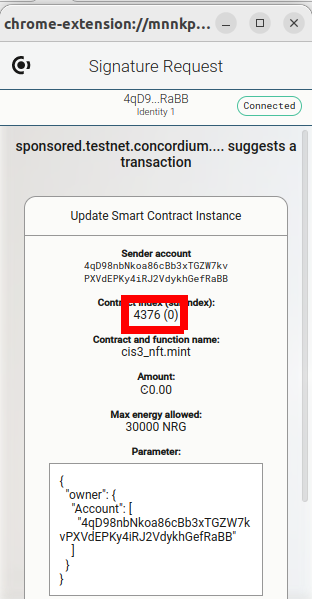
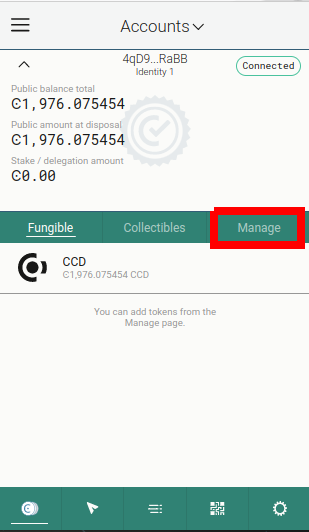
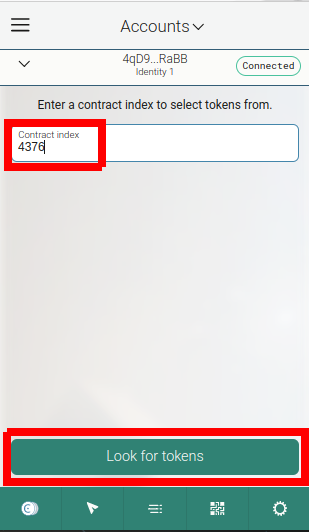
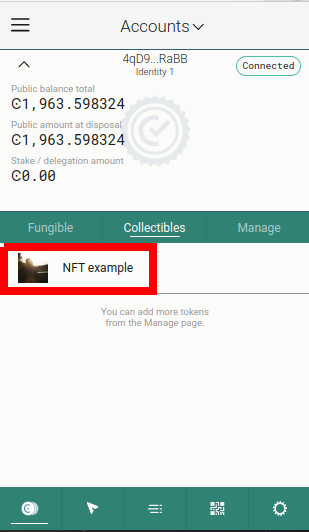
You can look up your minted token_id in the Concordium Wallet for Web by getting the smart contract index as seen below and searching for tokens in that contract that are owned by your account.

../../../_images/TokenId_1.png ../../../_images/TokenId_2.png ../../../_images/TokenId_3.png ../../../_images/TokenId_4.png ../../../_images/TokenId_5.png ../../../_images/TokenId_6.png ../../../_images/TokenId_7.png

Note

Every token_id would usually have its own metadata associated with it by e.g. appending the TOKEN_METADATA_URL with the token_id. But to simplify the metadata management for Concordium, the NFT smart contract used in the hosted demo app returns the same metadata hash (TOKEN_METADATA_URL) for all token_ids. The NFT picture in the below URL changes every time you access https://picsum.photos/40/40. Hence, the Concordium Wallet for Web depicts random new pictures for your minted NFT.

const TOKEN_METADATA_URL: &str = "https://gist.githubusercontent.com/abizjak/ab5b6fc0afb78acf23ee24d979eb7639/raw/7c03f174d628df1d2fd0dc8cffb319c89e770708/metadata.json";

previous

Sponsored Transactions Smart Contract

next

WalletConnect

Copyright 2021 - 2023, Concordium Software ApS

This website only aggregates and analyzes the actions you take here if you allow cookies. If you do not allow cookies, it protects your privacy, but also prevents the owner from learning from your actions and creating a better experience for you and other users.

Note that if you opt in and you clear your cookies, delete the opt-in cookie, or if you change computers or Web browsers, you will need to perform the opt-in procedure again.

Privacy policy