Native upgradability#
The goal of this tutorial is to deploy a contract-version1, upgrade its logic, and migrate its state to contract-version2.
The contract-version1
includes an upgrade function and the contract-version2
includes a migration function. These functions are explored in the next two sections.
The migration function#
When deploying contract-version1, you might not know the exact logic of the contract-version2 yet.
Contract-version2 might be a smart contract that fixes a security bug in your smart contract code which will be discovered at some point in the future.
For that reason, it is good to have the option to call a migration function in contract-version2 when executing the upgrade mechanism in contract-version1.
This allows you to add additional execution logic when upgrading the smart contract.
A migration function could have a variety of different purposes such as:
Log some events.
Change values in the state.
Change the shape of the smart contract state.
Note
There is no universal migration function and it is not necessary for all upgrades to call a migration function.
In the example smart contract, a migration function is provided that should be suitable for most use cases.
In more detail, the example migration function
focuses on how to change the shape of your smart contract state since this bullet point from above is non-trivial.
Contract-version1 allows you to call a migration function as part of the upgrade.
The migration function in contract-version2 changes the shape of the state from contract-version1 to contract-version2.
The upgrade function#
A native smart contract upgrade can be triggered on the host as seen in the code snippet below:
#[receive(
   ...
   low_level
)]
fn contract_name(
   ...
   host: &mut LowLevelHost,
   ...
)  ... {
   ...
   let result = host.upgrade(moduleReference);
   ...
}
The upgrade functions in the example smart contracts are marked as low_level. This is necessary since the default (high_level) mutable functions store the state of the contract at the end of
execution. This conflicts with migration since the shape of the state might be changed by the migration function. If the state is then written
by the default (high_level) upgrade function, it would overwrite the state stored by the migration function.
Greater control is given to the smart contract developer when using low_level functions (e.g., additional state manipulation
capabilities are exposed which are unavailable when using high_level functions). These additional state manipulation features are necessary to change the
shape of the state during the migration but they bear the risk that the state becomes corrupted if the migration function has some coding bugs.
Make sure you test your upgrade thoroughly (with integration tests as well as manual tests on testnet)
and ensure your state is migrated as intended before doing
the same smart contract upgrade on mainnet.
Note
To write smart contract code safely and to avoid accidentally corrupting your state,
you shouldn’t use low-level functions unless strictly necessary (e.g., for upgrade/migration functions).
Smart contract functions are by default
high_level (no need to add this attribute explicitly).
Note
You can also write a very simple upgrade mechanism using a high_level function with no migration function at all. This upgrade
mechanism requires that the shape of the smart contract state is the same in contract-version1 and contract-version2.
This means, the State struct in contract-version1 and contract-version2 has to be identical.
#[receive(
   contract = "contract_name",
   name = "upgrade",
   error = "ContractError",
   mutable
)]
fn contract_upgrade(
   _ctx: &ReceiveContext,
   host: &mut Host<State>,
) -> ContractResult<()> {
   // TODO: Include some authorization checks.

   // Trigger the upgrade.
   host.upgrade(params.module)?;

   // No `migration` function.

   Ok(())
}
The upgrade function in contract-version1 can be invoked with the following JSON file (input parameter):
{
   "migrate": {
      "Some": [
         [
         "<EntryPointNameOfMigrationFunction>",
         "<InputParametersOfMigrationFunction>"
         ]
      ]
   },
   "module": "<ModuleReferenceContractVersion2>"
}
The section executing an upgrade will give examples of how to set the input parameter for the upgrade function.
Note
If the module reference should be upgraded without invoking a migration function, use the JSON file (input parameter) below instead:
{
   "migrate": {
      "None": [
      ]
   },
   "module": "<ModuleReferenceContractVersion2>"
}
Warning
Since more responsibility is given to the smart contract developer, smart contract upgrade/migration functions
should be coded and executed by experts that know about the underlying risks. You are about to become such an expert.
You now have the required knowledge to execute the upgrade mechanism on testnet in the next section.
Executing an upgrade#
Clone the smart contract upgrade example.
$git clone --recurse-submodules [email protected]:Concordium/concordium-rust-smart-contracts.git
Navigate to the contract-version1 example folder:
$cd ./examples/smart-contract-upgrade/contract-version1
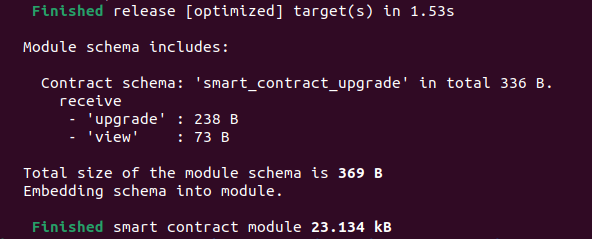
Compile the smart contract to a Wasm module which you will deploy to testnet in the next step.
$cargo concordium build -e --out smart_contract_upgrade.wasm.v1
Note
Comprehensive instructions on how to download and set up cargo-concordium can be found in Setup the development environment.
This command will create the smart_contract_upgrade.wasm.v1 file in your current folder. Deploy the smart contract module to testnet with the command:
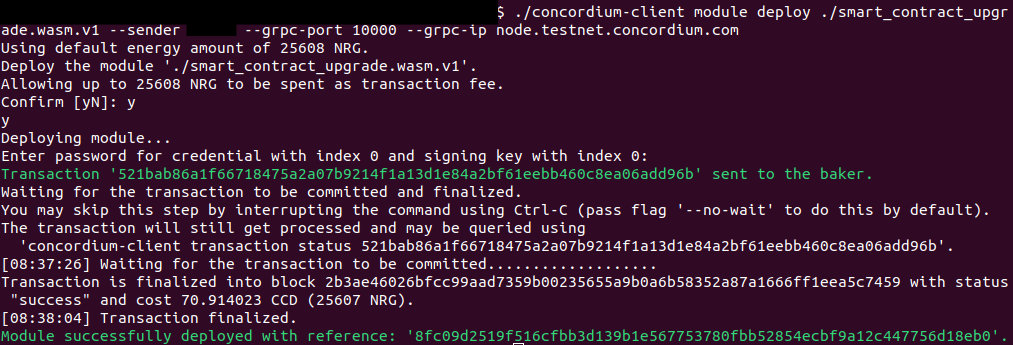
$concordium-client module deploy ./smart_contract_upgrade.wasm.v1 --sender <YourAccountAddress> --grpc-port 20000 --grpc-ip node.testnet.concordium.com
Note
Comprehensive instructions on how to download and set up concordium-client and how to import an account that you can use
for the placeholder YourAccountAddress above can be found in Setup the development environment.
Since other users will read this tutorial, you will likely get an error that the module above is already deployed.
If the module is already deployed or not deployed, it does not make a
difference because in both cases the console output will print the moduleReference that you need for the next step.
Initialize a contract-version1 smart contract instance with the command:
$concordium-client contract init <ModuleReference> --contract smart_contract_upgrade --energy 30000 --sender <YourAccountAddress> --grpc-port 20000 --grpc-ip node.testnet.concordium.com
For example, when using the module reference from the image above, the command will look as follows:
$concordium-client contract init 8fc09d2519f516cfbb3d139b1e567753780fbb52854ecbf9a12c447756d18eb0 --contract smart_contract_upgrade --energy 30000 --sender <YourAccountAddress> --grpc-port 20000 --grpc-ip node.testnet.concordium.com

As seen in the image above, this command returns your smart contract index 4462.
Before upgrading the contract-version1, you can check its state with the view function as follows:
$concordium-client contract invoke <YourContractVersion1Index> --entrypoint view --grpc-port 20000 --grpc-ip node.testnet.concordium.com
For example, when using the smart contract index from the image above, the command will look as follows:
$concordium-client contract invoke 4462 --entrypoint view --grpc-port 20000 --grpc-ip node.testnet.concordium.com
You should see the following output.

You need to compile and deploy contract-version2 before you can upgrade your smart contract instance contract-version1.
Navigate to the contract-version2 example folder:
$cd ./examples/smart-contract-upgrade/contract-version2
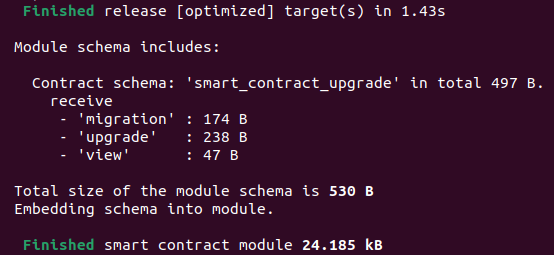
Compile the smart contract to a Wasm module which you will deploy to testnet in the next step.
$cargo concordium build -e --out smart_contract_upgrade.wasm.v1
This command will create the smart_contract_upgrade.wasm.v1 file in your current folder. Deploy the smart contract module to testnet with the command:
$concordium-client module deploy ./smart_contract_upgrade.wasm.v1 --sender <YourAccountAddress> --grpc-port 20000 --grpc-ip node.testnet.concordium.com
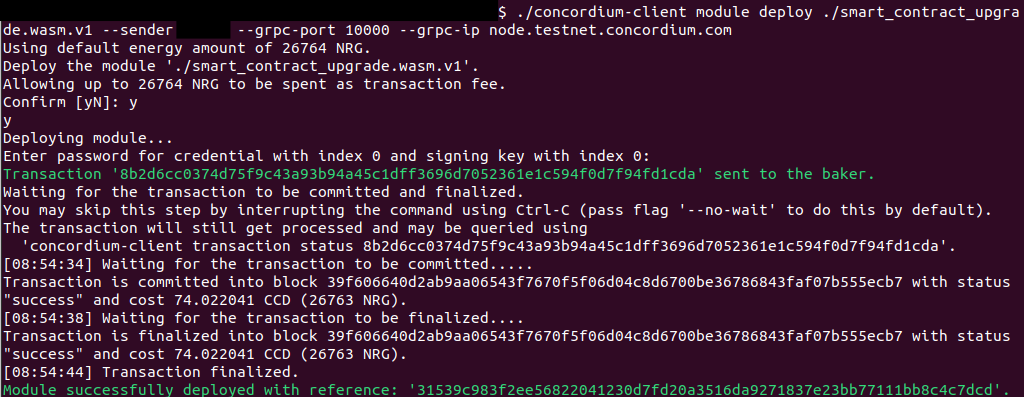
The moduleReference returned when deploying contract-version2 is different from the moduleReference when deploying contract-version1.
This shows that the module’s code is not identical.
Create a file named upgrade.json with the following content by inserting the moduleReference returned by the previous step:
{
   "migrate": {
      "Some": [
         [
         "migration",
         ""
         ]
      ]
   },
   "module": "<ModuleReferenceContractVersion2>"
}
For example, when using the module reference from the image above, the file will look as follows:
{
   "migrate": {
      "Some": [
         [
         "migration",
         ""
         ]
      ]
   },
   "module": "31539c983f2ee56822041230d7fd20a3516da9271837e23bb77111bb8c4c7dcd"
}
When invoking the upgrade function with the file above, it specifies that the smart contract
code should be upgraded to the module 31539c983f2ee56822041230d7fd20a3516da9271837e23bb77111bb8c4c7dcd
and the migration function should be invoked
with no input parameters (empty string: "") as part of the upgrade.
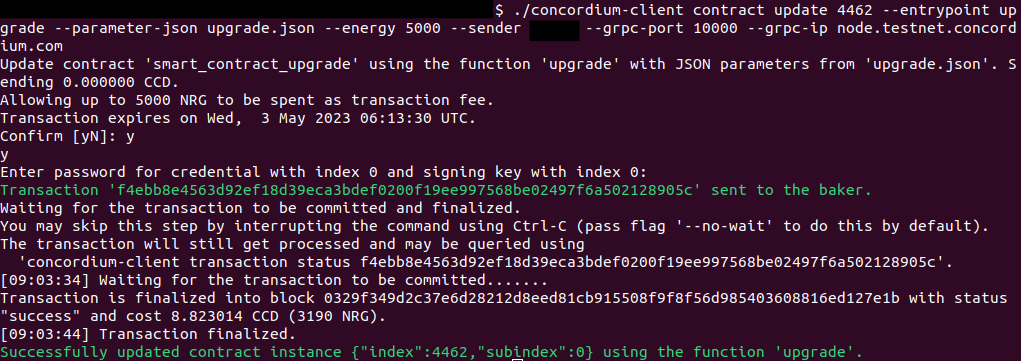
Upgrade the smart contract as follows:
$concordium-client contract update <YourContractVersion1Index> --entrypoint upgrade --parameter-json upgrade.json --energy 5000 --sender <YourAccountAddress> --grpc-port 20000 --grpc-ip node.testnet.concordium.com
For example, when using the smart contract index from the image above, the command will look as follows:
$concordium-client contract update 4462 --entrypoint upgrade --parameter-json upgrade.json --energy 5000 --sender <YourAccountAddress> --grpc-port 20000 --grpc-ip node.testnet.concordium.com
You should see the following output.
You can check that the state migration was successful by inspecting the state with the view function:
$concordium-client contract invoke <YourContractVersion1Index> --entrypoint view --grpc-port 20000 --grpc-ip node.testnet.concordium.com

If the migration function had a bug and changed the shape of the state incorrectly, your state might be corrupted. You might see different output errors in case of a corrupted state. One example is shown below:

