Run and manage a node on Windows#
This guide describes how you can run and manage a node on the Concordium network from a Windows computer. You can also run a node using Docker, Ubuntu, or macOS.
If you want to run a validator node on Windows, see Configure a node on Windows as validator.
Prerequisites#
Run Windows 10 or later or Windows Server 2019 or later.
Meet the minimum system requirements for running a node.
Note
Subscribe to the Mainnet status page or Testnet status page and the release information on Discourse to stay informed about updates and changes that may affect you as a node runner, including node software releases and protocol updates.
To subscribe to updates on the Mainnet/Testnet status page click Subscribe to get all updates or click Get updates to choose to get all updates or only updates for specific products.
Install/upgrade and run a node#
Note
Node version 4.5.0 introduced the GRPC V2 interface which is enabled by
default. If you have done special configuration of your node and want to
re-use the configuration file and have the new API enabled, make sure to edit
your configuration and add grpc2.port and grpc2.address settings. See
Concordium Windows node runner service configuration for more information.
Example for Mainnet:
grpc2.port = 20000
grpc2.ip = "127.0.0.1"
Example for Testnet:
grpc2.port = 20001
grpc2.ip = "127.0.0.1"
Note
When upgrading, you can only upgrade one minor version at a time, or from the last release of major version X to major version X+1. You cannot skip versions. For patches, you can skip versions e.g. X.X.0 to X.X.3, or X.1.1 to X.2.3. To download previous node versions, see Previous node versions.
IF UPGRADING: if you have done special configuration of your node, you may want to back up the service config file prior to upgrade, then replace the new one with your backup. This file is typically located at
C:\ProgramData\Concordium\Node Runner\nodes.toml.(The path on your system is determined by theConfigvalue in the registry keyHKEY_LOCAL_MACHINE\SOFTWARE\Concordium\Node Runner.) Or you can re-enter your values after upgrading. See Concordium Windows node runner service configuration for information about how to change the service configuration settings.Download the latest Windows Installer package (.msi file).
IF UPGRADING: it is a good idea to stop the node before running the installer for the new version so that you do not need to restart your computer. To do this, open Task Manager and stop the concordium-node.exe program for the node you want to upgrade. See Verify that the node is running for details about how to do this.
In the folder where you downloaded the .msi file, double-click the .msi file. The Concordium Node Setup Wizard opens. Select Next. If you see a message saying Windows protected your PC, select More info, and then select Run anyway.
Accept the terms of the End-User License Agreement and select Next.
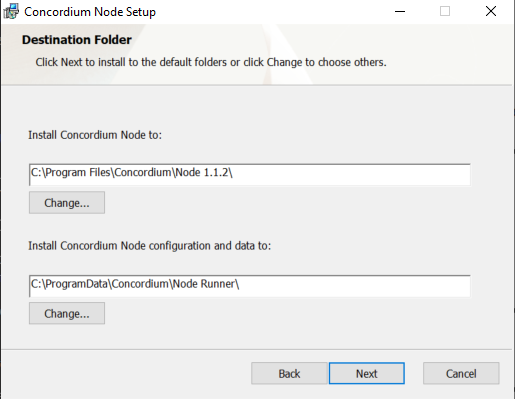
Set the Destination folders. The default is C:\ProgramData\Concordium\Node Runner.
In Install Concordium Node to, specify where to store the executable code.
In Install Concordium Node configuration and data to, specify where to store the node configuration and the blockchain databases and logs. Choose a drive that has sufficient space to accommodate the database and is sufficiently fast. For more information, see Requirements for running a node.
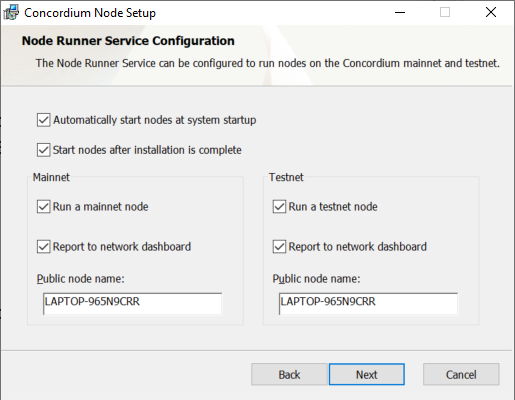
Select Next and configure the Node Runner Service. You have the following options:
Automatically start nodes at system startup: When selected, the node runs when the system starts. Choose this option when you plan to use the node frequently and need it to be up-to-date at short notice. If you don’t select this option, you’ll have to start the node manually when required, for example, when you want to use the Desktop Wallet or concordium-client. If you choose to start the node manually, it might take longer for the node to get up-to-date with the blockchain depending on when the node was last up-to-date.
Start nodes after installation is complete: The node will automatically start running after the installation is complete. Do not choose this option if you want to make further configuration changes before starting the node.
Mainnet or Testnet: Mainnet is the Concordium production blockchain where actual transactions occur, whereas testnet is for test and development. Select your preferred network for running the node: Run a mainnet node or Run a testnet node. You can run a node on just the mainnet or the testnet, or run nodes on both at the same time.
Report to the network dashboard: Select this option if you want to publish your node statistics to the relevant dashboard when the node is running. Go to the mainnet or testnet dashboard to view the statistics:
Public node name: Specify the name of your node as you want it to appear on the network dashboard if the node reports to the network dashboard.
Select Next, and then select Install to begin the installation. The Concordium Node is installed. If you see a message saying Do you want this app from an unknown publisher to make changes to your device?, select Yes. This message appears because the installation requires administrative permissions. If you’re not logged in with an administrative account, you’ll have to provide credentials for an administrator account to continue the installation.
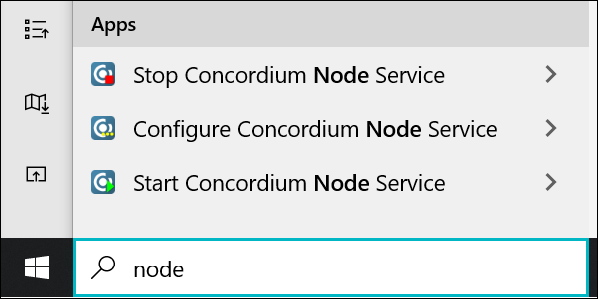
Select Finish to complete the installation. The following shortcuts are now available from the Start menu:
Start Concordium Node Service: Starts the node
Stop Concordium Node Service: Stops the node
Configure Concordium Node Service: Opens the configuration file.
Third Party Licenses: Shows the licenses the third party components are distributed under.
Verify that the node is running#
The node runs as a background service with no user interface. To verify that it’s running, use the Task Manager.
Search for task in the Search bar, and then select Task Manager.
Select the Details tab, and verify that the following are running:
node-runner-service.exe, which is the service.concordium-node.exefor each node you are running. For example, if you’re running a node on both testnet and mainnet, you’ll see two instances of concordium-node.exe.node-collector.exefor each node that reports to the network dashboard.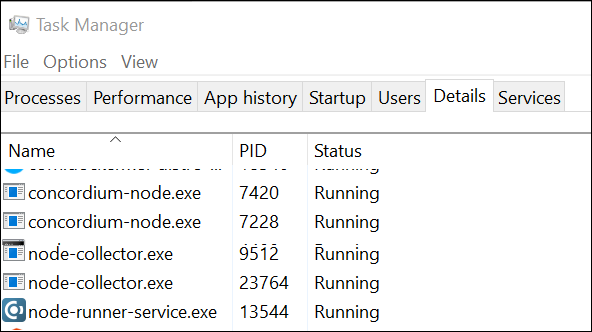
Select the Services tab and verify that
ConcordiumNodeis running.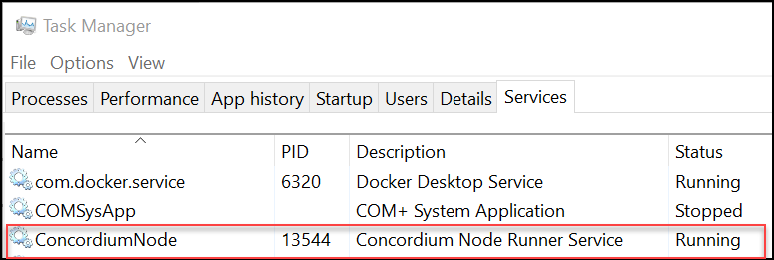
If the node is running properly and reporting to the network dashboards, you can see it on the dashboard.
Enable inbound connections#
If you are running your node behind a firewall, or behind your home router, then you will probably only be able to connect to other nodes, but other nodes will not be able to initiate connections to your node. This is perfectly fine, and your node will fully participate in the Concordium network. It will be able to send transactions and, if so configured, to produce blocks.
However you can also make your node an even better network participant by enabling inbound connections. By default, concordium-node listens on port 8888 for inbound connections on Mainnet and on port 8889 for inbound connections on Testnet. Depending on your network and platform configuration you will either need to forward an external port to 8888 or 8889 on your router, open it in your firewall, or both. The details of how this is done will depend on your configuration. See Concordium Windows node runner service configuration for more information.
Connect a node to the Desktop Wallet#
You can also verify that a node is running by connecting it to the Desktop Wallet.
In the Desktop Wallet, go to Settings, and then select Node settings.
If you’re running the mainnet version of the Desktop Wallet, you must connect to a mainnet node. In the Address field, enter 127.0.0.1 and in the Port field enter 20000.
If you’re running the testnet version of the Desktop Wallet, you must connect to a testnet node. In the Address field, enter 127.0.0.1 and in the Port field enter 20001.
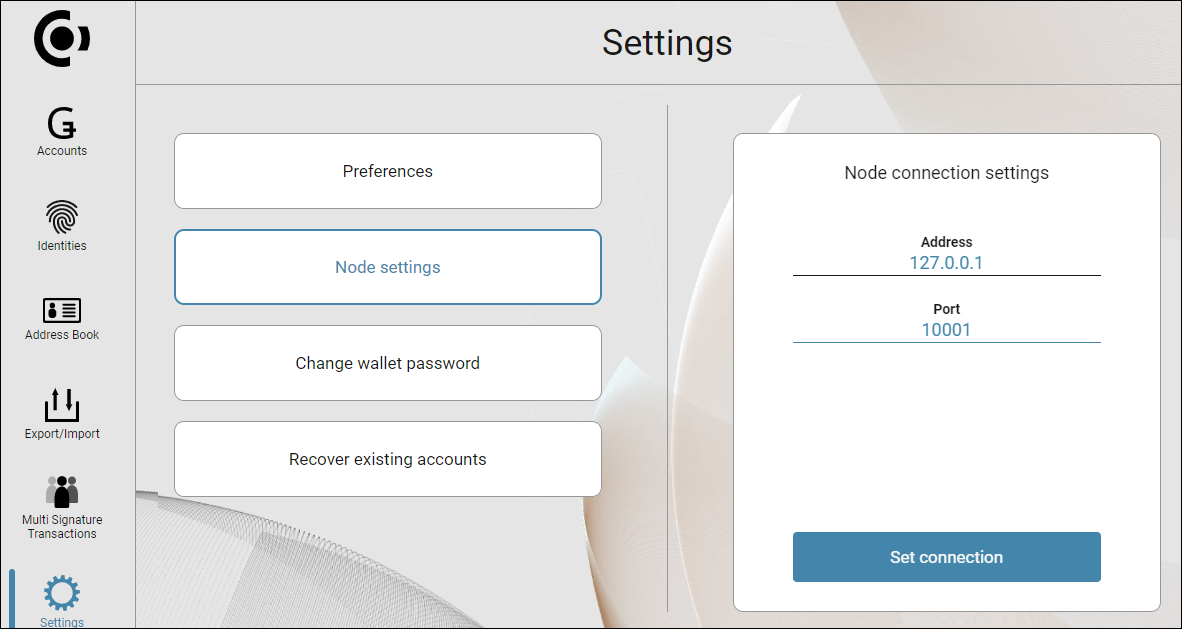
Select Set connection. If the connection works and the node is running properly, there’s a message saying Successfully connected.
Change the node startup settings#
If you want to change whether the node runner service starts automatically, you can use the Services app.
Search for services in the Search bar, and then select Services.
Right-click Concordium Node Runner Service, and then select Properties.
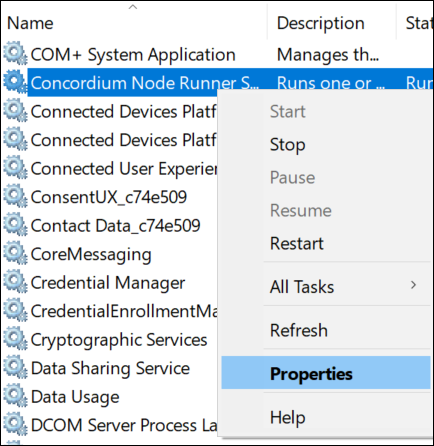
On the General tab, select the relevant Startup type from the list, and then select OK or Apply.
Configure the Concordium Node Service#
You can change the mainnet or testnet node configuration with the Configure Concordium Node Service.
Search for configure concordium node in the Search bar, and then select Configure Concordium Node Service. If you see a message saying Do you want to allow this app to make changes to your device?, select Yes. The configuration file opens in Notepad.
For more information, see Concordium Windows node runner service configuration.
View the node log#
You can find the node logs here:
Mainnet:
C:\ProgramData\Concordium\Node Runner\mainnet\logsTestnet:
C:\ProgramData\Concordium\Node Runner\testnet\logs
If you specified a different installation folder for the configuration and data, the path might be different.
The files mainnet.log and testnet.log contain the latest logs, with mainnet.0.log and mainnet.1.log containing progressively older logs and the same for testnet.0.log and testnet.1.log.
The log files are rolled when the latest log file exceeds 50 MB. This means that mainnet.0.log is renamed to mainnet.1.log (replacing the old file if present), mainnet.log is renamed to mainnet.0.log, and a new, empty testnet.log is created.
The same goes for testnet. testnet.0.log is renamed to testnet.1.log (replacing the old file if present), testnet.log is renamed to testnet.0.log, and a new, empty testnet.log is created.
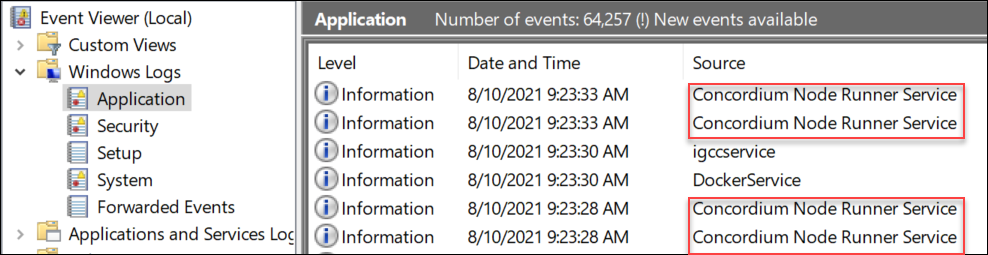
When nodes are stopped or started, this is also recorded in the system event log.
Search for event in the Search bar, and then select Event Viewer.
Select Windows Logs, and then under Source look for Concordium Node Runner Service.
Synchronize a node with the network#
When you start a node for the first time, it can take a while to synchronize the node with the rest of the network, since it has to get all blocks from its peers. That is why all node distributions since 6.1 come with out of band catchup enabled. This will speed up the initial catchup and during out of band catchup the node will not have any peers.
The out of band catchup can be kept enabled even after the node is caught up, but is not necessary. If you wish to disable it do the the following:
Search for configure concordium node in the Search bar, and then select Configure Concordium Node Service. The configuration file opens in Notepad.
Remove the environment variables from the configuration file:
For mainnet, remove the following line from the
[node.mainnet]section:
node.env.CONCORDIUM_NODE_CONSENSUS_DOWNLOAD_BLOCKS_FROM = 'https://catchup.mainnet.concordium.software/blocks.idx'
For testnet, remove the following line from the
[node.testnet]section:
node.env.CONCORDIUM_NODE_CONSENSUS_DOWNLOAD_BLOCKS_FROM = 'https://catchup.testnet.concordium.com/blocks.idx'
Save the configuration file.
In the Search bar, search for and select Stop Concordium Service Node to stop the node, and then search for and select Start Concordium Service Node to restart the node.
Node collector configuration#
Since version 5.3.2 of the node, the collector uses the GRPC V2 interface. Therefore, in order to run the collector, it is required that the node which the collector connects to has the GRPC V2 interface enabled. For information about how to do this, see the note at the top of this topic.
Note
If the node is configured with TLS, then CONCORDIUM_NODE_COLLECTOR_GRPC_HOST must be configured such that it uses the domain of the certificate.
Validation on a Windows node#
For information about validation on a Windows node, see Run a validator node on Windows.
Uninstall a node running on Windows#
In the Search bar, enter add, and then select Add or Remove Programs.
Under Apps & features, search for Concordium, and then select Concordium Node.
Select Modify, and then in the Node Setup Wizard select Next.
Select Remove. If you plan to remove the node permanently, select Remove node data folder to remove all files and subfolders in the folder. Don’t select this option if you are only removing the node to perform an upgrade or otherwise want to keep the data, logs, or any other files in the data folder.
Select Next, and then select Remove.
If the service is running, when you uninstall it you’ll see a message saying that the system has to restart to update files and services. Select OK. (If the service is not running, you’ll not see this message). If you see a message saying Do you want to allow this app from an unknown publisher to make changes to your device?, select Yes.
Select Finish, to complete the removal of the Concordium node.
To verify that the node has been removed, in the Search bar, enter task manager, and then select the Task Manager.
Go to the Details tab and verify that node-collector.exe has been removed from the list, and then go to the Services tab and verify that ConcordiumNode has been removed from the list.
